MIDI Recording
In this chapter you'll learn how to record a MIDI performance from your controller. Your controller could be a keyboard or any other sort of instrument that you can use to generate MIDI note data. We covered how to set up a MIDI controller in the previous chapter.
In this chapter, we'll go further and cover the details of how to record your MIDI performance. You will also learn about the various MIDI recording modes. The MIDI implementation in Waveform is fairly comprehensive while also being quite easy to use. Let's get started.
Setting up a Track
There isn't a special type of MIDI track in Waveform. Any track can be used for audio, MIDI, or Step Clips. To record MIDI, pick any unused track or create a new track. On the track, set up the input by selecting your MIDI controller. Play a few notes on your MIDI controller to see if you have MIDI activity.

A Track Set Up for MIDI Recording
To hear any sound, you'll need to insert a virtual instrument. Do so by dragging the plugin object to the mixer section, or search for the synth plugin in the Search tab on the Browser. When you find it, drag it over to the mixer section of your track. We usually recommend dropping it to the left of the Volume & Pan plugin. As soon as you drop it, the user interface will open up for the instrument plugin. Choose a suitable preset for the part.
We covered all of this in the previous chapter. If when you play notes on your controller you don't hear anything, go back to MIDI Setup and make sure the MIDI input is set up correctly.
Recording a MIDI Performance
Recording MIDI is very much like recording audio:
- Enable the track for recording by clicking the red R on the track input

Enable Recording
- In the Transport, click the red Record button to start recording. You can also do this using the keyboard shortcut R.

Start Recording
- Record your MIDI performance
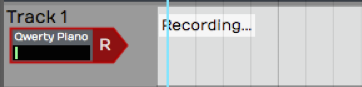
MIDI Recording in Process
- To stop, either press R again or just hit the space bar.
💡 Tip: To record your MIDI performance with a metronome click, configure and enable Click using the procedure outlined in MIDI Editing.
Playing Back a MIDI Performance
If everything went according to plan, you'll have created a MIDI clip. Notice, the MIDI notes on the clip. If you zoom the track vertically, the MIDI clip will, at one point, flip to the MIDI editor mode. In this mode, you can edit MIDI notes, which we cover in MIDI Editing.

MIDI Clip Following Recording
Position the cursor before the newly recorded MIDI clip, the press the spacebar again to playback. You should be able to hear the exact performance.
💡 Tip: If you don't like what you recorded, simply select the MIDI clip and press backspace to delete it.
Piano Roll View
As I mentioned above, as you expand the track vertically, you'll notice that at a certain point MIDI clips will switch to edit mode. The Waveform MIDI editor is what is commonly called a piano roll view (PRV). In this view, you can clearly see the notes along with a vertical piano graphic located along the left.
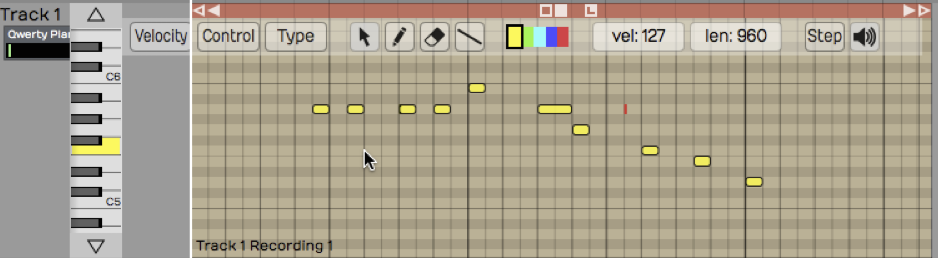
Track Expanded to the MIDI Editor
📝 Note: The PRV in Waveform allows you to see the timing of notes as they relate to the timeline, and the pitch of notes as they relate to a piano keyboard. The graphic length of a note represents how long that note is held in musical time.
The MIDI editor PRV includes everything you need to edit MIDI data. You can add notes, delete notes, copy notes, and duplicate them. You can also work with velocity and other controller values. We'll get into the details later when we go deeper into [MIDI editing].
MIDI Record Modes - The Action Property
Select a MIDI input and look in properties at the item labeled Action. The drop down menu for Action gives you a variety of record modes.
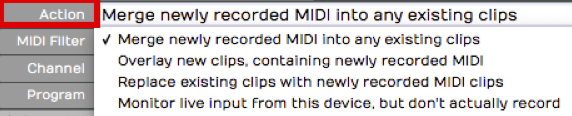
MIDI Record Modes
Merge Mode
By default, Action is set to Merge newly recorded MIDI into any existing clips. If you rewind and record in some more notes, you will find that they're merged into the MIDI clip that you created in the first pass. It doesn't replace notes that you recorded before; it just adds new notes and and merges them with the original MIDI clip.
If you mess up an otherwise good performance in merge mode, undo the new notes by pressing Cmd + Z / Ctrl + Z.
💡 Tip: Merge mode can be very helpful if you're building up a part pass by pass, particularly when layering a drum part and adding additional drum hits in each pass.
Replace Mode
If you wanted to replace what you played previously, change Action in properties for the input to Replace existing clips with newly recorded MIDI clips. Now when you start to record, the new recording will create an entirely new MIDI clip and it will gradually overwrite what you had before. It doesn't exactly erase the original clip. If any portion of the clip is still visible, you can trim the edges of it and expose the original data. Of course, Undo will get you back to where you started from if things don't go well.
📝 Note: You can envision replace mode as being similar to tape recording. As you record something new onto tape, you are erasing the section you are recording over.
Overlay Mode
In overlay mode, as you record you'll get a new MIDI clip stacked on top of the original clip. After you have recorded this way, you'll hear the output from both clips mixed together.
During playback, you will hear the overlapping MIDI clips merged together.
MIDI Input Quantize
To find MIDI Input Quantize, click on the input and locate the Quantize property. The drop down menu for Quantize offers a wide variety of beat subdivisions.
Notice how this works; you are selecting a subdivision of the beat (not the bar). For example, if you want to quantize your input to the nearest eighth note, you don't select 1/8 beat from this list, you select 1/2 beat, because an eighth note is half of a quarter note (when working in 4/4 time).
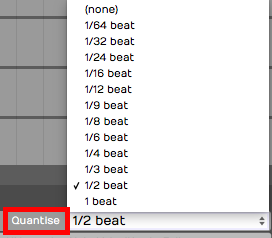
Input Quantize Options
As you record, you're going to hear the notes however you play them, but on playback all of your notes will be snapped to the value you set in Quantize.
Note that the results of quantizing can sound somewhat unnatural, because this approach quantizes both the note start and the note ending. Notes get stretched out and tend to sound mechanical. In general, input quantize is more useful for drum programming than playing something like a piano part.
📝 Note: Input quantizing does not happen in real time. You hear the result during playback.
There are other ways (Apply Groove) to quantize after the fact. We'll be getting into that in Quantizing MIDI Notes.
Moving On
That's an introduction to MIDI recording. You learned the essential options to set up a MIDI input. You learned about the MIDI record modes. We also took a quick look at input quantizing. Next up, loop recording with MIDI!