Comping
In this chapter, we're going to go over the cool comping features in Waveform. Comping is an editing technique where you select the best phrases from numerous takes to build a composite or "comp." The idea is to create the best possible take. Engineers have been doing this for years, but Traction makes it much easier than the traditional methods.
Comping typically starts with takes recorded in Loop mode, covered in Loop Recording.
Loop recording used to be a prerequisite for doing comping. Starting with T6, Waveform also allows you to build composites from any collection of tracks, using the new Comp Groups feature. More on that later in the chapter.
Copy Your Edit
Before you start comping, it is a good to create a copy of the Edit. This is so you can return to the raw takes, in the event you later wish to do the composite a different way.
📝 Note: We are assuming that you have already recorded using the technique in the previous chapter. If not, go back to Loop Recording and get some takes recorded!
- When you finish loop recording, make sure to save the Edit with Save > Save edit (Cmd + S / ctrl + S).
- Go to the Projects tab and select the correct Edit. In the Controls panel, click Create a Copy.
- It is recommended to keep your Edits organized by adding a revision number. Do so by clicking on each Edit, then editing the Name property.
- On the original Edit, add a comment that says, "This version is before comping" or similar.
- Close the tab for the original Edit and open the new copied version.
Strategically creating copies of your Edits and naming them in a logical way, works like a revision control system. You can always roll back if something goes wrong, or if you just change your mind.
Comping Takes
Now that everything is setup, it's time to get to the creative, part of the process.
- Select the Audio clip that contains the takes you want to comp.
Takes Follow Loop Recording
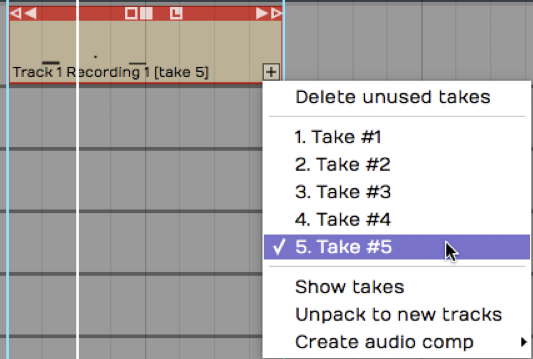
- Click on the plus (+) icon in the lower right corner of the clip and select Show takes. That expands the clip to show all of the individual takes. If you play back over this section of the Edit, you will hear the very last take you did during loop recording.
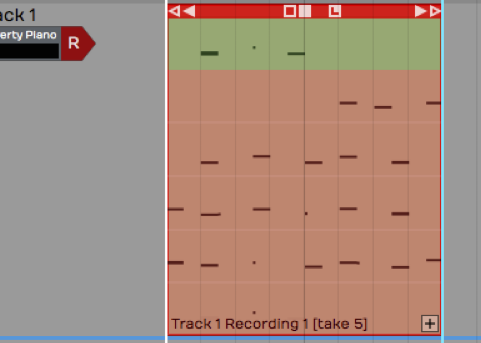
Takes in the Expanded View
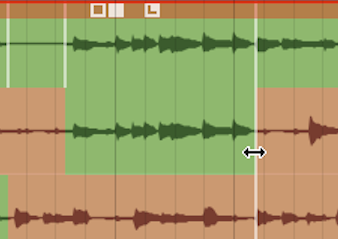
- To build a composite take, click and drag a range over a phrase from any take. That phrase is instantly promoted to the active take. This drag-to-select action is called "swiping."
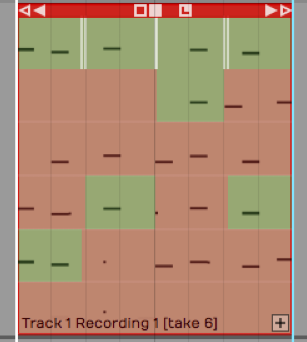
Swipe a Phrase to Add it to the Active Take
💡 Tip: While comping, sometimes it's helpful to have the cursor return where you started playback whenever you stop playback. Do so by enabling Options > Return cursor to start position when play stops. This makes it easier to audition phrase by phrase without needing to constantly reposition the cursor.
- Continue swiping and auditioning to build up the composite. If you want to switch a selected phrase to a different take, just click another take. The selection instantly moves to that take.
Building the Composite Take
- If the swipe selection doesn't fully enclose a phrase, adjust either edge of the selection by simply dragging the edge to trim it.
Trim the Edges of a Selection
📝 Note: While comping sometimes you'll use a little bit from every take. Other times you'll predominantly use one take and just fix a couple of bad phrases.
Once you have finished, click the plus (+) icon and select Hide takes. At that point, you're finished comping!
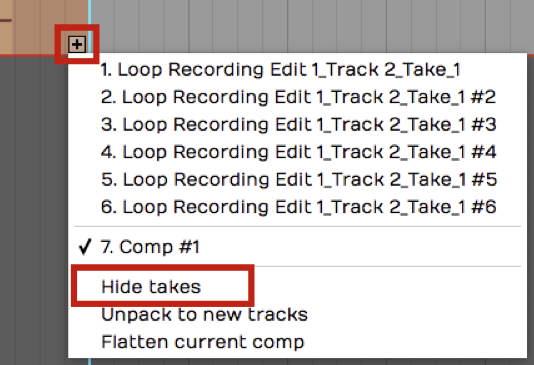
Hide Takes
💡 Tip: After comping, it is a great time to create another copy of the Edit and add a note that this was saved after comping. This gives you the option to roll back if you ever want to make some changes.
Flatten Comp
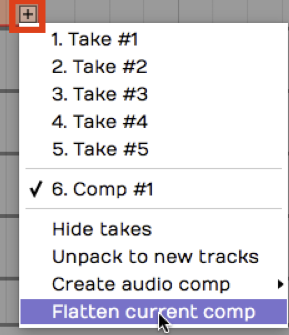
If you feel compelled to remove the underlying takes from the Edit, click the plus (+) icon on the clip and select Flatten current comp. This gives you the option to delete the source files. Keep in mind that this operation is permanent.

Flatten Current Comp
💡 Tip: Don't flatten the comp without first saving a copy of the Edit. Also, we do not recommend selecting the option to delete the source files as this will remove them for your other saved Edits.
Setting up a Comp Group
T6 introduced Comp Groups, a feature that allows you to use swipe comping with any group of tracks. This works similarly to the techniques described above for comping takes. The difference is that you first add the tracks involved to a Comp Group.
Select Tracks to Comp
Select all the tracks you want use to build the composite. These are typically recorded as various takes of a lead vocal or solo instrument. However you can use any collection of tracks you want.

Select the Tracks to Comp
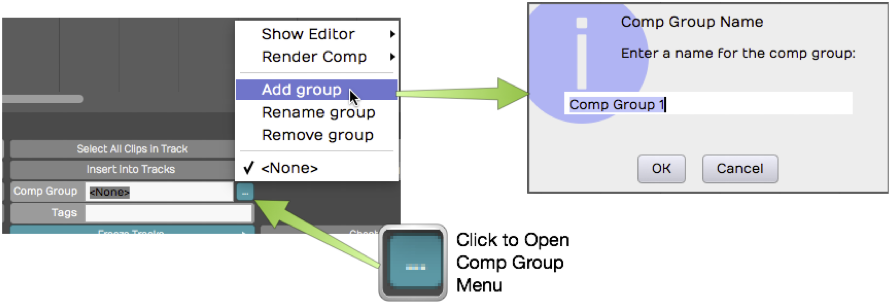
Create a Comp Group
In the properties, open the Comp Group menu and select Add group. This opens the Comp Group Name dialog box. The name will default to Comp Group 1 which is fine. You can change it to something more descriptive if you want. Click OK.
Creating a Comp Group
Add a Track to a Comp Group
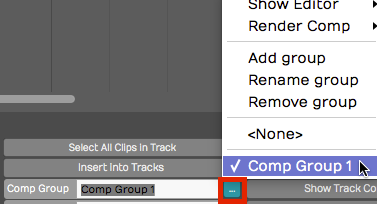
Any tracks pre-selected at the time you created Comp Group 1 are automatically added as you create the Comp Group. To add another track to Comp Group 1, select the track, open the Comp Group menu and select Comp Group 1.
Adding Another Track to Comp Group 1**
Removing a Track from a Comp Group To take a track out of a comp group, first, select the track. In the Comp Group menu, select None.
Comping Tracks Using a Comp Group
With some tracks added to a Comp Group, it is easy to start comping.
- Select one of the tracks then in the Comp Group menu select Show Editor > Edit track comps. This puts the tracks in to comp mode.
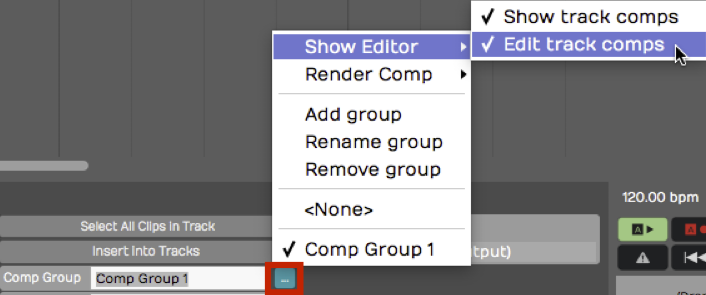
Enable Comp Mode
- Now you can start swiping to select phrases from any of the tracks. On playback only the selected phrases are played back.
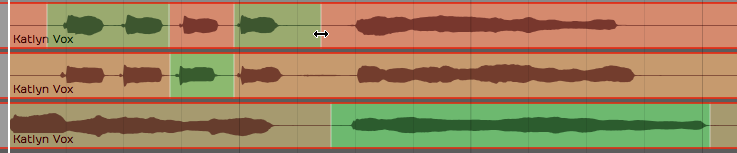
Swiping Phrases to Create a Composite
- You can adjust the window of your selection by dragging either edge of range. This works very similarly to comping takes which we covered earlier in the chapter.
💡 Tip: If you want to have good control over the silent parts of a comp, it helps to add a blank track to the Comp Group. For the parts you want to silence, simply swipe over that range on the blank track.
Comp Group Editor
Here are few more things to know about the Comp Group Editor.
Show Track Comps - When you enable comp group editing using Show Editor > Edit track comps, another option, Show track comps is also turned on. This enables the color coding of the swipe selections on the tracks. You can turn this on separately if you want. This way you can see the comp selections but leave Edit comp groups turned off so you don't accidentally change them.
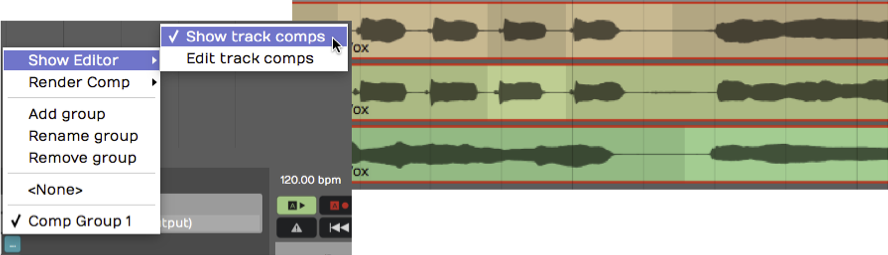
Show Track Comps
Render Comp - When you have the composite complete, you can render the result to single track. The Comp Group menu gives you two options for this. Render and replace comp group replaces the all the comp group tracks with the resulting track. Render comp group to a new track leaves the existing tracks in place and adds a new track with the composite.
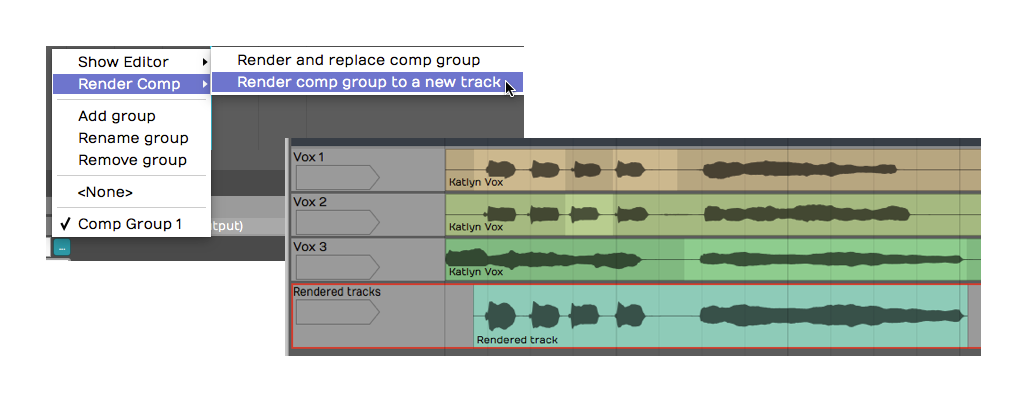
Rendering a Comp to a New Track
Add, Rename, Remove - These options on the Comp Group menu give you all the features need to manage your comp groups.

Comp Group Management Features
One interesting thing about comp groups is that you can have as many of them active in the Edit as you want. There are many uses beside typical comping, for example you could comp silence with tom tracks instead of gating. Comping is also a fast way to mash up two beats or two different songs.
Moving On
The comping features in Waveform are very easy to use. As you are learning Waveform, make sure to explore these powerful features.