The Actions Panel
The Actions panel gives you a single place to see and run the things you can do to whatever you currently have selected. Select a track, a clip, a plugin, or a parameter, and the panel updates to show the actions that apply to it. It's a fast way to reach commands without hunting through menus, and it's where you go to mark your favourite actions so they show up in the Quick Actions menu.
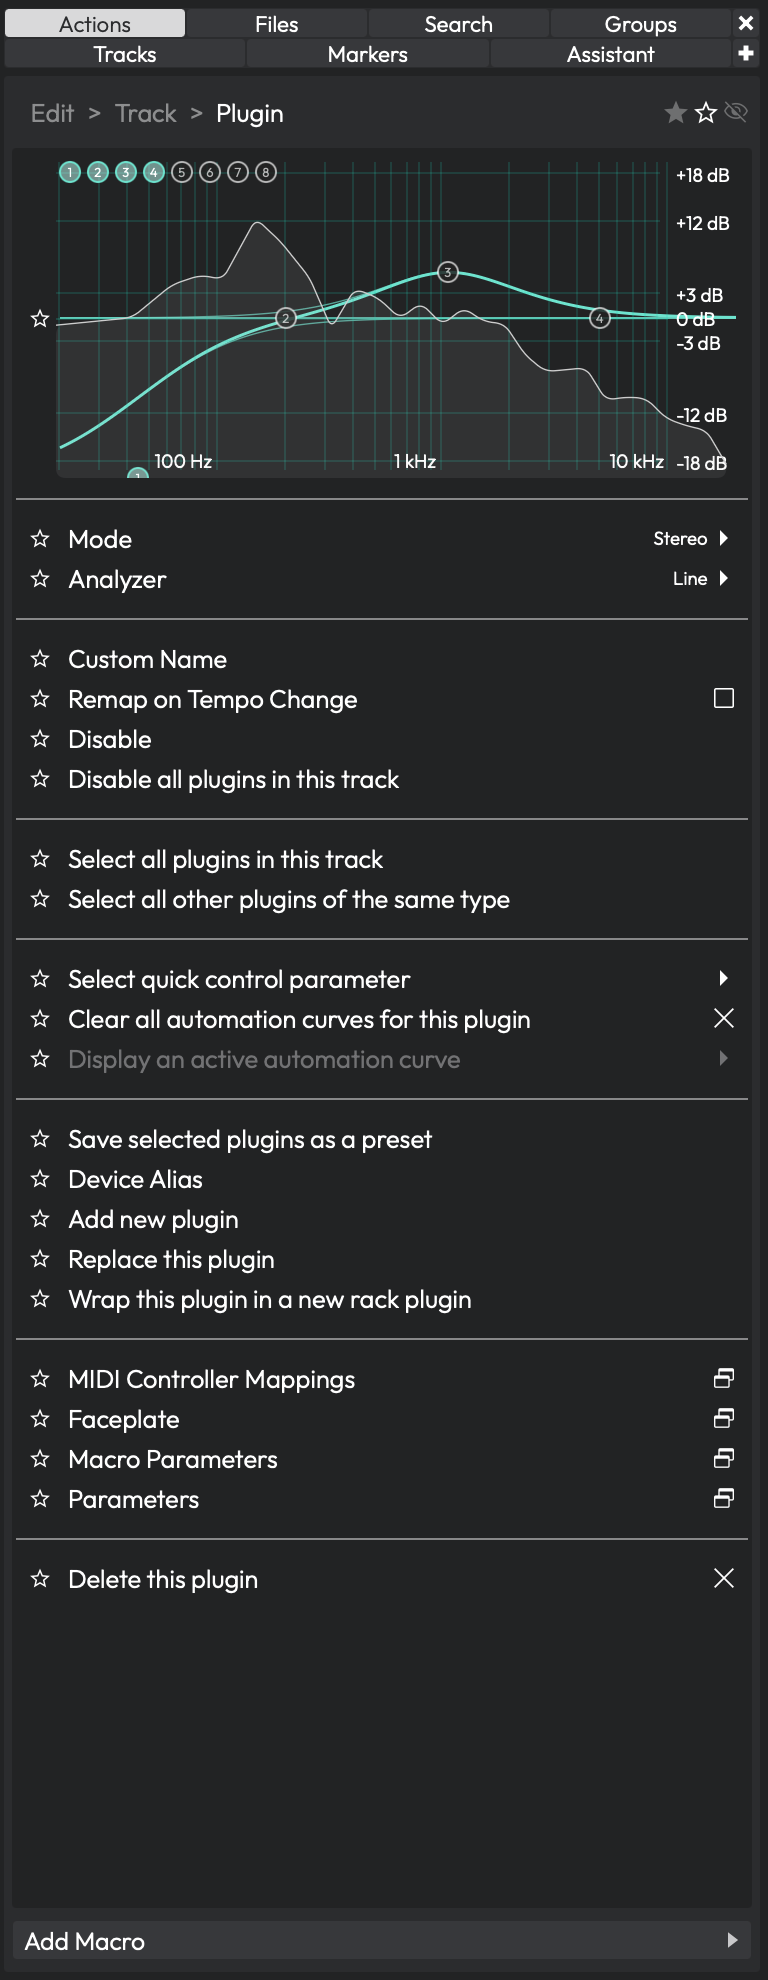 The Actions panel showing actions for the current selection
How the Panel Works
The Actions panel is contextual. It watches what you have selected and shows a list of actions relevant to that selection. Click an empty area of the arrangement and you'll see Edit-level actions; click a track and you'll see track actions; click a clip and the list changes again.
Many actions are more than just buttons. Depending on the action, a row might contain a toggle, a slider, a text field, or a dropdown, so you can change a value right there in the panel without opening a separate properties view.
To run an action, click its row. For an action that holds a value, interact with its control directly — type into the text field, drag the slider, or pick from the dropdown.
💡 Tip: The Actions panel and the Properties panel overlap a lot, but the Actions panel is selection-driven and compact. I keep it open in the sidebar when I'm doing repetitive editing so the commands I need follow my selection around.
Opening the Panel
There are a few ways to get to the Actions panel:
- Add it as a tab in the left-hand sidebar (the same area as the Browser).
- Open it as a dedicated panel on the right side of the Edit tab.
- Use the Show Actions item in the View menu of the Edit tab.
- Toggle it from the Eye panel selector at the upper right (F9), using the Hide/show the actions panel control.
- Float it into its own window so it stays visible while you work elsewhere.
You can also assign a keyboard shortcut to show and hide the panel. Look for the Show/Hide Actions Panel command on the Keyboard Shortcuts page in Settings.
The Breadcrumb
At the top of the panel is a breadcrumb that shows the path to your current selection — for example, the track, then the clip, then a parameter within it. The breadcrumb is more than a label: click any item in it to jump back up to that level and show the actions for it.
This is handy when you've drilled down into a parameter and want to get back to the actions for the parent track or clip without re-selecting it in the arrangement.
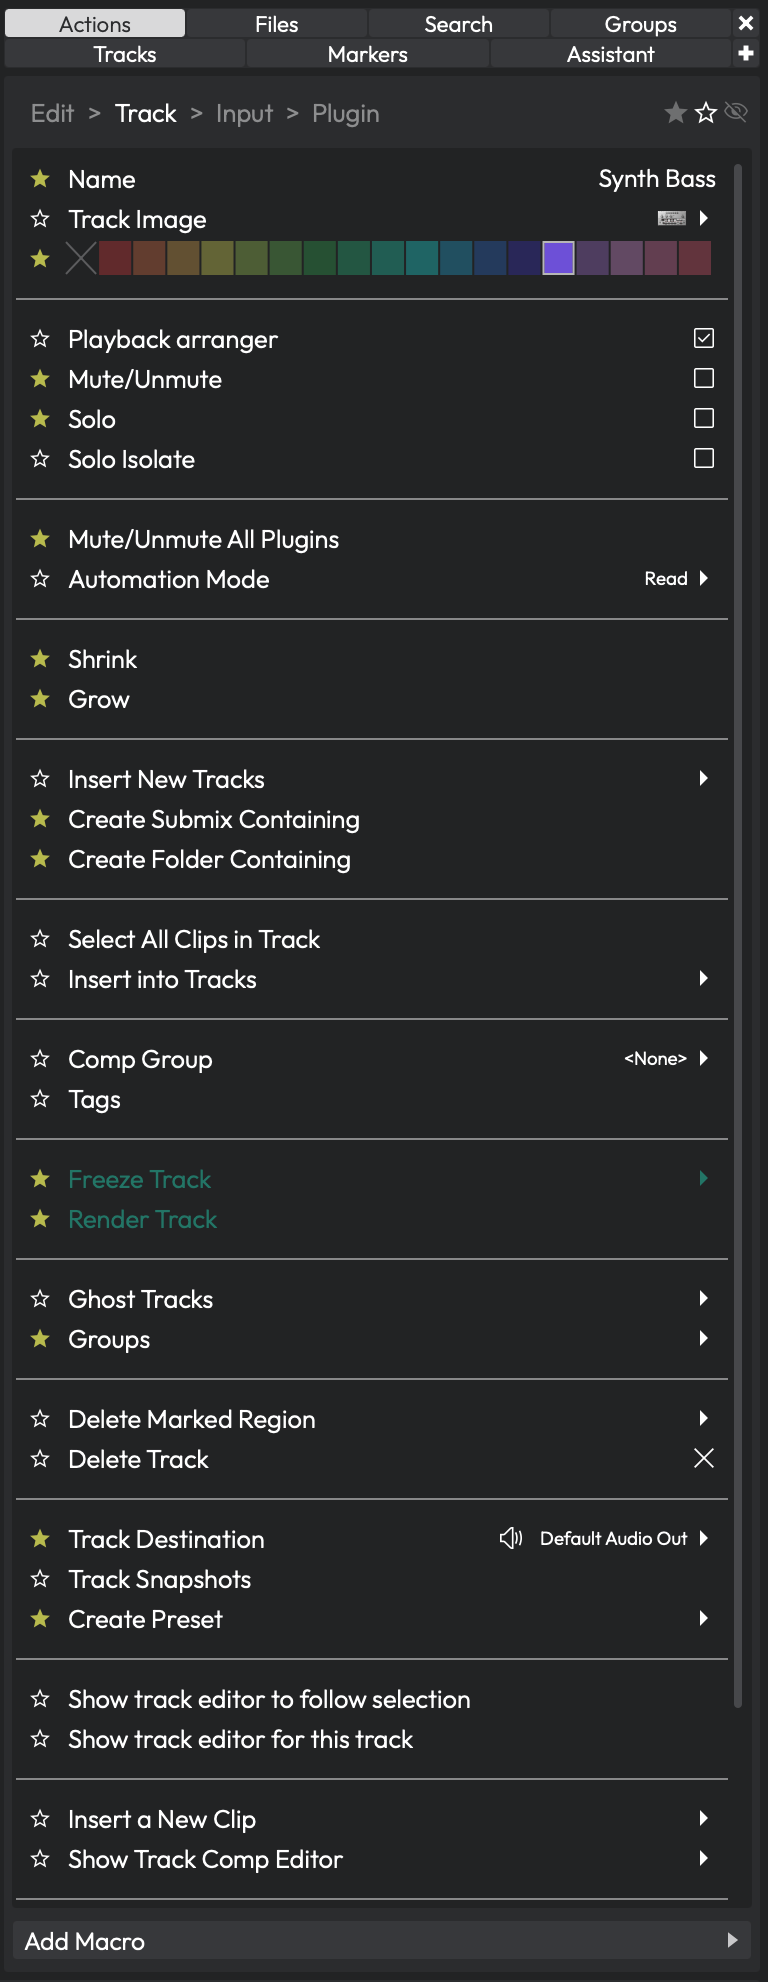
The Actions panel showing the actions for a selected track.
Favourites and Display Modes
Not every action is something you use every day, so the panel lets you curate what it shows. Three small icon buttons at the top of the panel switch between display modes:
Favourites (filled star) — Shows only the actions you've marked as favourites. This keeps the list short and focused on the commands you actually reach for.
All actions (outline star) — Shows every available action for the current selection, except the ones you've hidden. (Default)
Show hidden (eye) — Shows everything, including actions you've hidden. Use this when you need to bring a hidden action back or run something you normally keep out of the way.
Marking Favourites and Hiding Actions
Each row has a star on its left edge. Click it to toggle that action as a favourite. Favourites are what appear in Quick Actions, so this is how you build your own short list of go-to commands.
To hide an action you don't want cluttering the list, right-click the row (to the right of the star) and choose Hide. The same menu has a Favourite entry that does the same thing as clicking the star. Hidden actions only reappear when you switch to the Show hidden mode.
📝 Note: The display mode is remembered between sessions, and the Actions panel and the Quick Actions menu remember their modes separately. You can have the panel showing all actions while the Quick Actions menu shows only favourites.
Adding Macros
If the action you want doesn't exist as a built-in, you can add one of your own macros to the list. Click the Add Macro button at the bottom of the panel and pick a script from the menu. The macro is attached to the type of item you currently have selected, so it shows up whenever you select a similar item later.
See the Macros chapter for how to write and manage the scripts themselves.
Locking and Floating
When the panel is configured to allow it, two extra controls appear at the top left:
Lock — Locks the panel to its current contents so it stops following your selection. This is useful when you want to keep a particular set of actions on screen while you click around elsewhere. Click it again to unlock and resume tracking the selection.
Dock / Undock — Pops the panel out into a floating window, or docks it back again. A floating Actions panel stays on top so you can keep it beside whatever you're working on.
The Action Menu in the Transport Bar
You don't have to open the full panel to get at your actions. The transport bar at the bottom of the window has its own breadcrumb that opens the same context-sensitive actions as a pop-up action menu, right where you're working. Click the breadcrumb to open the menu for the current selection, pick an action, and it's gone again.
The transport breadcrumb carries the same favourites / all / hidden mode buttons as the panel, but it remembers its own setting independently — so the menu can show only your favourites while the docked panel shows everything. By default the menu shows your favourites only, which is why marking favourites in the Actions panel matters.
Shift-click the breadcrumb to see all actions for that item, ignoring the menu's usual mode — a quick way to reach something you haven't favourited without changing your setting. When the menu is open, press Return or Escape to dismiss it, or just click elsewhere.
📝 Note: If the menu opens empty in favourites mode, you'll see "No actions to show. Mark some actions as favourites." Mark a few favourites in the Actions panel, or Shift-click to see everything.
The Quick Actions Bar and Window
Quick Actions is a separate feature from the action menu above. Instead of showing the actions for whatever you've selected, it gives you rows of buttons that you assign to specific commands — your own custom shortcut bars that stay put regardless of selection.
 Rows of assignable Quick Actions buttons
Assigning Quick Actions
Each row is a Quick Actions bar of buttons. To add a button, click the + at the end of a row (Add a quick action button). To assign a command to a button, right-click it and choose a command from the Assign action submenu. The right-click menu also shows what's currently assigned and offers a Remove option.
You can rearrange buttons by dragging them, and add or remove whole rows using the controls at the end of each row (Add a row / Remove this row). Each set of buttons is saved as a named "Shortcuts" file, so you can keep different layouts for different jobs.
The Quick Actions Bar (above the transport)
The Quick Actions bar can sit directly above the transport bar, always in view. To show or hide it, open the Eye panel selector at the upper right (F9) and click the Show/Hide the quick actions panel toggle. You can also use the Show Quick actions bar command, or assign it a keyboard shortcut. Here the bar is limited to a handful of rows, enough for the commands you reach for constantly.
The Quick Actions Window
For a larger workspace, open the Quick Actions window — a floating window that combines a mixer with a much taller Quick Actions bar (up to thirty rows). Click the Quick Actions button (the shortcut-style icon) in the transport bar to toggle it, or right-click that button and choose Open Quick actions window.
 The Quick Actions window, with the mixer above and Quick Actions below
Down the left edge of the window are three toggles that control what it shows: a mixer toggle, a Quick Actions toggle, and a touch mode toggle that enlarges the buttons for touchscreens. Turn off the mixer to use the window purely as a big board of action buttons, or turn off Quick Actions to use it as a standalone mixer.
💡 Tip: Assign a keyboard shortcut to Show/Hide Quick Actions Window. Combined with touch mode, the window makes a handy control surface on a second monitor or tablet.
⚡ Things to Watch Out For
-
If the panel looks empty, check the display mode. In Favourites mode, the panel only shows actions you've starred. A selection with no favourited actions will look blank — switch to the all-actions (outline star) mode to see what's available.
-
Hidden actions stay hidden everywhere except Show hidden mode. If you can't find an action you expect, you may have hidden it earlier. Switch to the eye mode to bring it back.
-
The panel and the transport action menu have independent display modes. Changing the mode in one place doesn't change the other, so don't be surprised if your docked panel and the transport menu show different lists.
-
Don't confuse the action menu with Quick Actions. The action menu (and the docked panel) follows your selection automatically; the Quick Actions bar and window show buttons you assign by hand and don't change with your selection.
-
A locked panel won't follow your selection. If the panel seems "stuck" on the wrong item, check whether the lock button is engaged.
-
The dedicated panel and floating window depend on your edition. Basic actions are available across editions from version 11, but the dedicated Actions panel requires version 12 or later. If you don't see the panel option, your edition may not include it.
Moving On
The Actions panel and the transport action menu are about reaching context-sensitive commands quickly, while the Quick Actions bar and window let you build your own fixed boards of shortcut buttons. Once you're comfortable marking favourites and assigning buttons, the natural next step is building your own commands — see the Macros chapter for writing scripts, and the Keyboard Shortcuts chapter for assigning them to keys.