Loop Recording
Loop recording is a really cool way to quickly record multiple takes of a part onto a single track. Following loop recording, you can easily pick the best take and make it active, so that it is the one you hear during playback.
Loop recording also sets you up to use the track comping tools that are built into Waveform. Comping allows you to go phrase by phrase through the different takes and choose the best parts and create a composite best take. We cover comping in detail in Comping.
Getting into Loop Recording Mode
Getting into loop recording in Waveform is simple - enable Loop (L) in the Transport. Now when you click Record, recording will only occur between the In-marker and Out-marker. The transport will "loop" between the In-marker and Out-marker allowing you to automatically record take after take, until you hit Stop.
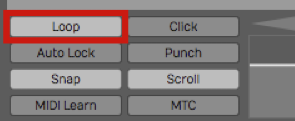
Turn on Loop for loop recording mode
Loop Recording Step-by-Step
- Set the In-marker and the Out-marker over the range that you would like to do the loop recording. To set the In-marker, position the cursor and press I. To set the Out-marker, position the cursor at the end of the loop and press O.

Set the In-marker & Out-marker
📝 Note: The Click count-in works for loop recording. If you want a running start for each take, set Click Track > Pre-record count-in length to one or two bars.
- Configure the input and check your levels just like we did for standard recording.
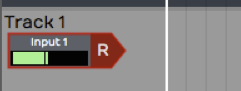
Configure the Input for Recording
- Click Record (R) on the transport to start recording.
While recording when the cursor hits the Out-marker, Waveform will automatically loop back for the next take. You can do as many takes as you like.
Selecting the Best Take
After loop recording, you will have a number of takes stacked within the Audio clip. The very last take you recorded is what you will hear during playback. That is called the "active take." To select a different take for the active take, click the plus (+) sign in the lower right corner of the clip. You will see a list of all takes there. Pick the one you want to promote to the active take. You can audition all the takes and make your favorite one the active take.
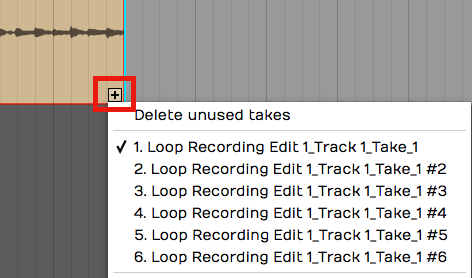
Choosing the Active Take
💡 Tip: With your takes recorded this way, it is perfectly set up for comping, which we will cover in the [next chapter].
Unpacking Takes to Tracks
If you want to work with your loop recorded takes as separate audio tracks, it is easy to unpack the takes to tracks. To do so, click the plus (+) sign and then select Unpack to new tracks.
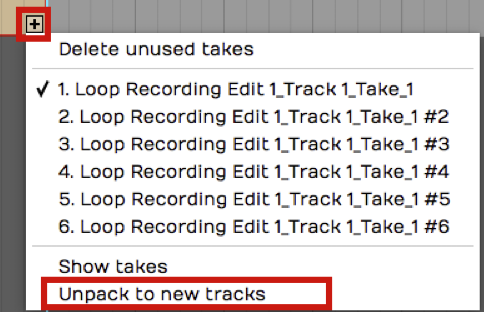
Unpack Takes to Tracks
That instantly coverts an Audio clip full of takes to a series of tracks containing separate Audio clips. Now you can use normal audio editing to move them around, chop them up, or arrange them into a song.
Moving on
The secret to loop recording is to set the In-marker and Out-marker over the section you want to record, make sure Loop is turned on, and then record like you normally would. Loop recording also sets you up for comping, which is covered in the next chapter.