Groove Doctor
The Groove Doctor fixes the timing of recorded audio. It detects the beats (transients) in a performance, then cuts, snaps, and smooths the audio so it lines up with the grid — or with the feel of a groove template. It's the tool to reach for when a drum take is a little loose, a bass line drifts off the beat, or you want to lock a live performance to the click without re-recording it.
📝 Note: The Groove Doctor is part of Waveform Pro only. It isn't available in the Free or OEM editions.
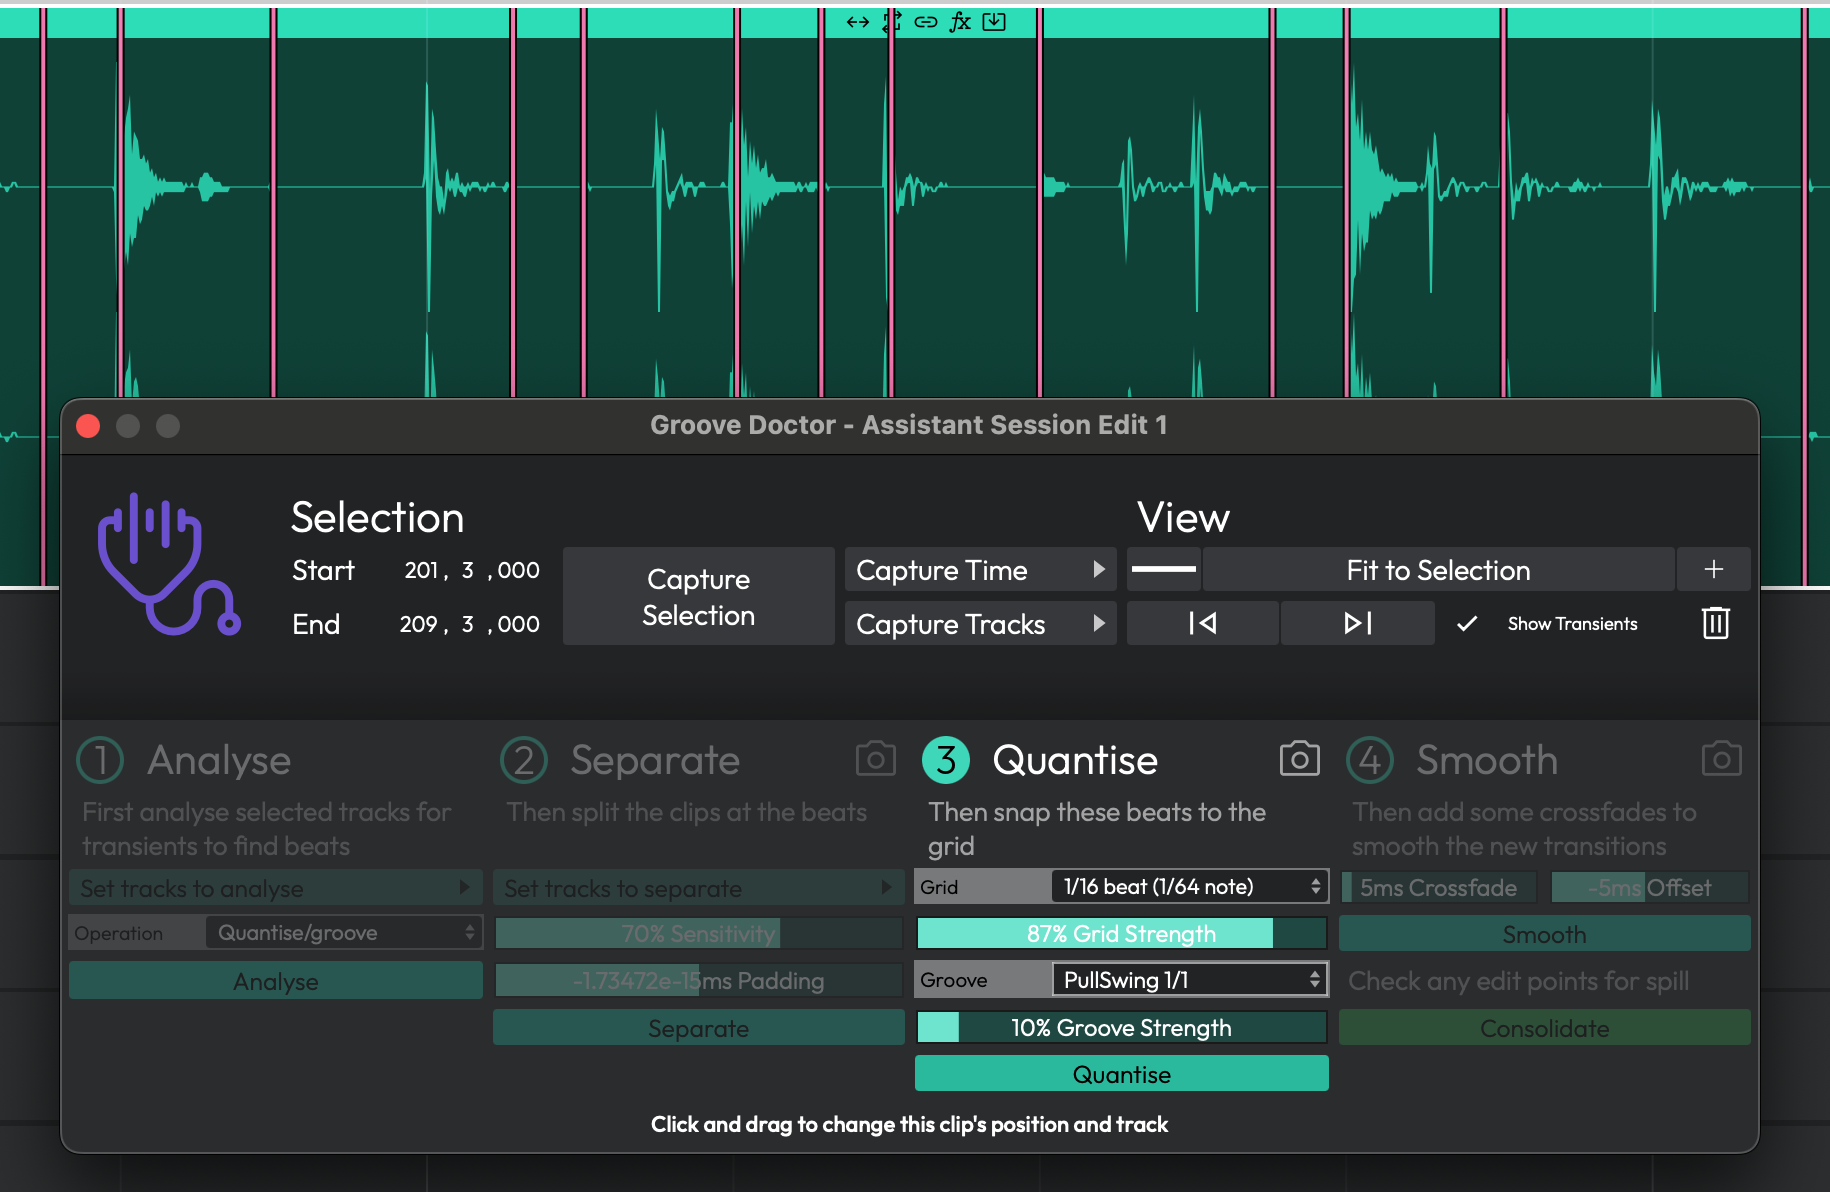 The Groove Doctor window
This is an audio tool, not a MIDI one. To quantise MIDI notes, see the Quantizing MIDI Notes chapter instead. It's also separate from the Groove Template editor (opened from the View menu), which manages and imports the groove templates themselves — though the Groove Doctor's Extract Groove mode can create a template that the Groove Template editor then looks after.
Opening the Groove Doctor
The Groove Doctor opens in its own floating window, titled "Groove Doctor - " followed by your edit's name. You can open it in three ways:
-
Click the stethoscope button in the transport bar (tooltip "Show or hide Groove Doctor window").
-
Use the View menu and choose Show Groove Doctor.
- Run the command Show or hide Groove Doctor window. There's no default keyboard shortcut — assign one via Settings > Keyboard Shortcuts if you use it often. A second command, Zoom to fit Groove Doctor selection, frames your captured range in the main Edit view.
The window is a fixed size and can't be resized; its position is remembered per edit.
The Top Panels
Two panels sit across the top of the window and stay visible no matter which workflow you're in.
Selection
This is where you tell the Groove Doctor what to work on — a time range and a set of tracks.
- Start / End — The time range, shown in your edit's timecode format. You can type values directly.
- Capture Selection — Grabs both the time range and the tracks from your current selection in the Edit in one click. This is usually the fastest way to set up.
- Capture Time — Sets just the time range, from a sub-menu: From selected range, From loop range, or From selected clips.
- Capture Tracks — Sets just the tracks, from a sub-menu: From group, From selected range, From selected tracks, or From selected clips.
View
Controls for navigating the waveform while you work. These don't change your audio.
- Zoom − / Zoom + — Zoom the waveform out and in.
- Fit to Selection — Zoom so the captured range fills the view.
- Previous / Next clip — Jump between clips.
- Show Transients — Toggles the detected beat markers on and off. These markers also appear overlaid on the main Edit view, not just in this window. (Default: on)
- Trash — Clears all detected transient markers.
Correcting Timing — the Common Workflow
The Groove Doctor is a guided, numbered workflow. The lit-up number tells you which stage is active; earlier stages dim once you move on. The most common job is the Quantise/groove operation, which cuts the audio at each beat and snaps the pieces to the grid. Here's the full pass:
- Select the range and tracks you want to fix in the Edit, then click Capture Selection in the Groove Doctor.
- In Stage 1 - Analyse, leave the Operation dropdown on Quantise/groove and click Analyse. A progress bar runs while Waveform finds the beats; click Cancel to stop it. When it finishes, the Doctor advances to Stage 2 automatically.
- In Stage 2 - Separate, adjust Sensitivity and Padding if needed (see below), then click Separate. This splits the clips at every detected beat.
- In Stage 3 - Quantise, pick a Grid, set the Grid Strength, and optionally choose a Groove template. Click Quantise to snap the pieces into time.
- In Stage 4 - Smooth, set a Crossfade to blend the joins, optionally nudge everything with Offset, and click Smooth.
- When you're happy, click Consolidate to flatten all the pieces back into a single clip.
💡 Tip: Each stage from Separate onward has a small camera snapshot button in its title bar. Click it before you run that stage to save a Track Snapshot you can roll back to. These edits are destructive, so snapshotting first is cheap insurance. See the Track Snapshots chapter for how to restore one.
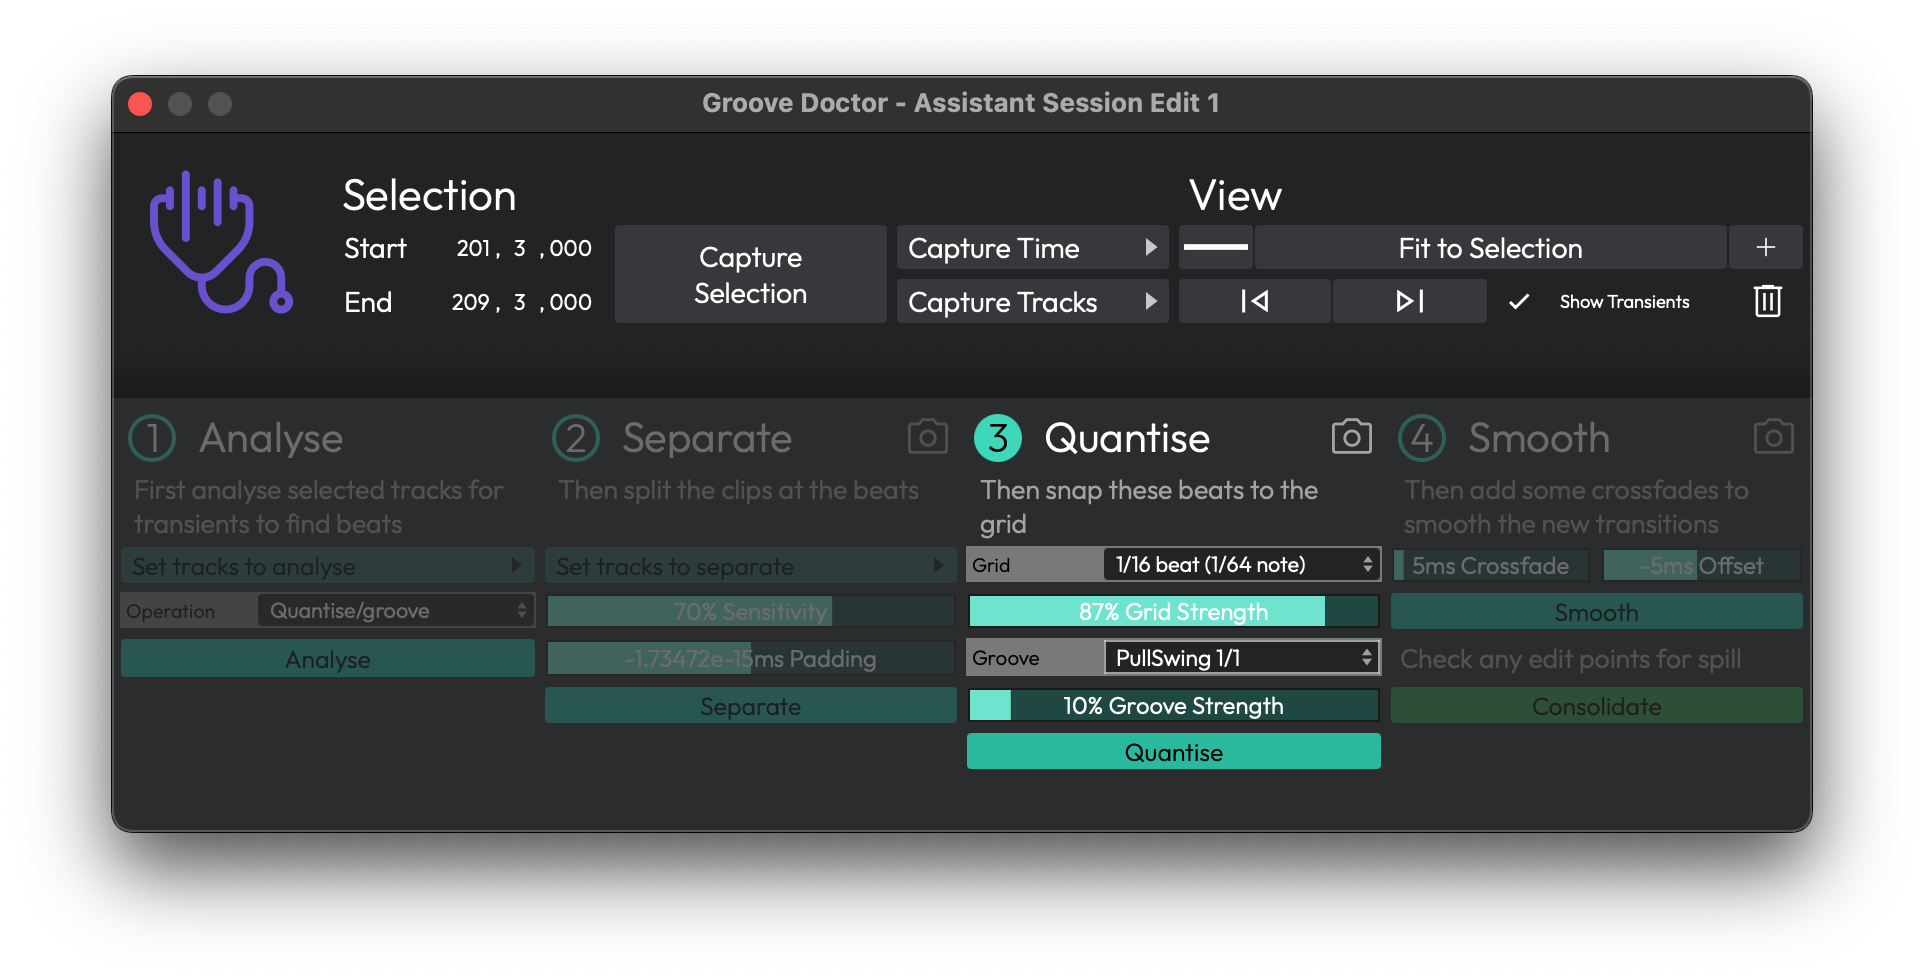 Working through the Quantise/groove stages
Stage Reference
Stage 1 — Analyse
Operation (Choices: Quantise/groove, Warp quantise/groove, Extract tempo map, Extract groove) — Chooses the whole workflow. The remaining stages change depending on what you pick here. (Default: Quantise/groove)
Analyse — Runs transient detection across the captured range. A Cancel button and progress bar appear while it works.
The four operations do the following:
- Quantise/groove — Splits clips at the beats, snaps them to the grid/groove, then smooths and consolidates.
- Warp quantise/groove — Time-stretches (warps) the audio onto the grid without cutting it, then consolidates.
- Extract tempo map — Reads the bar transients and writes a matching tempo map to the edit's tempo track.
- Extract groove — Reads the beat transients and saves them as a new groove template you can reuse elsewhere.
Stage 2 — Detection Settings
The second stage tunes which beats are used. The exact controls depend on the operation:
Sensitivity — How readily a peak counts as a beat. Higher values find more transients; lower values keep only the strongest hits. (Range: 0–100%)
Padding — Nudges the cut point earlier or later than the detected transient. A small negative value cuts slightly before the hit, which usually sounds more natural. (Range: −50 to +50 ms)
For Quantise/groove this stage is Separate (its button cuts the clips); for Warp quantise/groove it's Warp, with a Next button that simply moves you on. The two extract operations have their own Stage 2 and stop there — they have no Stages 3 and 4:
- Extract tempo map adds an Apply button. If your tempo track already has tempo changes in the range, you'll be asked to confirm "Override Existing Tempos?" before they're replaced.
- Extract groove adds a Resolution dropdown (Choices: 1/8 beat, 1/4 beat, 1/3 beat, 1/2 beat, 1 beat) and an Extract Groove button that prompts you for a "Groove Name?". (Default: 1/8 beat)
Stage 3 — Quantise (Quantise/groove and Warp modes)
Grid — The note value the beats snap to. The choices come from your edit's available quantise values.
Grid Strength — How far each beat moves toward the grid. At 100% beats land exactly on the grid; lower values keep some of the original feel. (Range: 0–100%, Default: 100%)
Groove (Choices: None plus your installed groove templates) — Applies the timing feel of a groove template on top of the grid snap. (Default: None)
Groove Strength — How strongly the groove template is applied. This is only available for parameterised templates; for ordinary templates it's greyed out. (Range: 0–100%)
📝 Note: The Groove Strength control and parameterised groove templates come from the templated grooves feature (Waveform Pro and Free, version 11 and later). When that feature isn't present these controls are hidden and the window is a little taller.
Stage 4 — Smooth or Consolidate
For Quantise/groove this stage is Smooth:
Crossfade — How much neighbouring pieces overlap to hide the joins. (Range: 0–100 ms)
Offset — Shifts every quantised clip start earlier or later, handy if the whole part feels a touch ahead of or behind the beat. (Range: −100 to +100 ms)
After smoothing, Consolidate flattens all the pieces into one clip. A reminder label, "Check any edit points for spill," prompts you to listen across the joins before committing.
For Warp quantise/groove this stage is just Consolidate — a single button (plus its snapshot button) that flattens the warped result.
A help bar along the bottom of the window shows a short description of whichever control your mouse is hovering over.
⚡ Things to Watch Out For
⚠️ Warning: The Groove Doctor's operations are destructive — they cut, move, and render your audio clips. Use the per-stage snapshot buttons to save a restore point before each step.
⚠️ Warning: Extract tempo map overwrites any existing tempo changes within the captured range once you confirm the prompt.
⚠️ Warning: Warp quantise/groove renders and consolidates the clips before warping and suppresses the normal undo step, so you can't simply press Undo to get back. Take a snapshot first.
📝 Note: The window is a fixed size and can't be resized. Its position is saved per edit, so it reopens where you left it.
Moving On
The Groove Doctor is the heavier, beat-by-beat way to fix audio timing. For lighter, hands-on corrections, the Warp Time editor lets you bend audio in place by dragging warp points — see the Warp Time chapter. And because every stage can save a restore point, it's worth reading the Track Snapshots chapter so you're comfortable rolling back if a pass doesn't go the way you hoped.